Ansible Tutorials - Step by Step Guide
Configuration Management
Push Based vs Pull Based CM
Configuration Management Tools
What is Ansible?
Features of Ansible
Ansible Architecture
Ansible Playbooks
Ansible ad-hoc commands
Ansible installation on Ubuntu
Ansible Tower
Summary
What is Configuration Management?
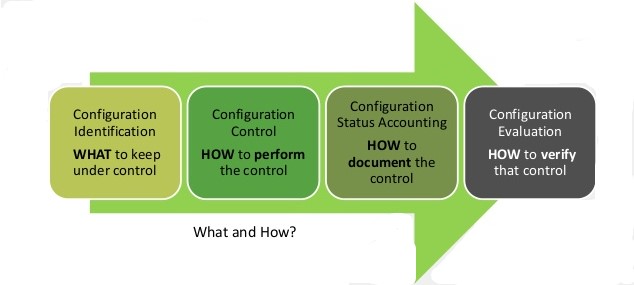
The process of standardizing and administering resource configurations and entire IT infrastructure in an automated way is Configuration Management. It is the concept where you put your server infrastructure as code.
It helps to systematically manage, organize, and control the changes in the documents, codes and other entities during the SDLC.
It aims to control costs and work effort involved in making changes to the software system.
Primary goal: increase productivity with minimal mistakes.
Benefits:
- Consistency of systems and software.
- CM improves efficiency as manual processes are replaced with automated ones.
Push versus Pull based CM
Configuration Management tools implement one (or both) of these models of management. Push-based CM and Pull-based CM are the ways in which a CM tool performs actions, like installing packages or writing files.
Some CM tools which use a pull model, have an agent installed on the servers which runs periodically to pull the latest definitions from a central repository and apply them to the server. Other tools which use a push model, have the central server trigger updates to manage the code on the servers.
Pull Model
Good scalability but difficult management.
- The server nodes run an agent daemon that periodically checks from the master node if/when there are any updates to be pulled and applied.
- A daemon needs to be installed on all machines and a setup of the central authority is required.
Push Model
Simple management and easy setup but poor scalability.
- Here, it is the central server or the master node which takes the responsibility to contact the server nodes to send updates as and when they occur.
- Whenever a change is made to the infrastructure (code), each node is informed of the update and they run the changes.
Configuration Management Tools
Configuration management tools facilitate faster, repeatable, scalable and predictable deployments and help in maintaining the desired state.

Some advantages of using configuration management tools are:
- Code navigation is easier due to compliance with coding conventions
- Idempotency is ensured, which implies that the end state remains unaltered, regardless of the number of times the code is executed
- Distributed design improvises management of large numbers of remote servers
There are various types of configuration management tools available, each having specific features that make them apt for certain scenarios more than the other.

- Ansible Ansible is a very simple IT automation platform that eases out the deployment of your applications and systems using SSH, with no agents to install on remote systems. We will cover Ansible in detail in further sections.
- Chef Chef uses a series of resources written in Ruby called “recipes”, to keep the infrastructure running up-to-date and compliant. Chef can run either in client/server mode or in a standalone configuration. It integrates well with the major cloud providers for automatic provisioning and configuration of new machines.
- Puppet Puppet is an automated administrative engine which performs administrative tasks based on a particular specification. It usually works in a client-server architecture where an agent communicates with the server to get configuration instructions. Puppet uses a declarative language or Ruby for the system configuration. Puppet uses the push model by default, but the pull model can also be configured.
- Salt Salt is an awesome CM tool for high-speed data collection. It scales beyond tens of thousands of servers. Python modules are used to handle configuration details which manage all of Salt’s remote execution and state management behavior. Configurations are maintained in Salt state files, which have entire details required to keep a system in the desired state.
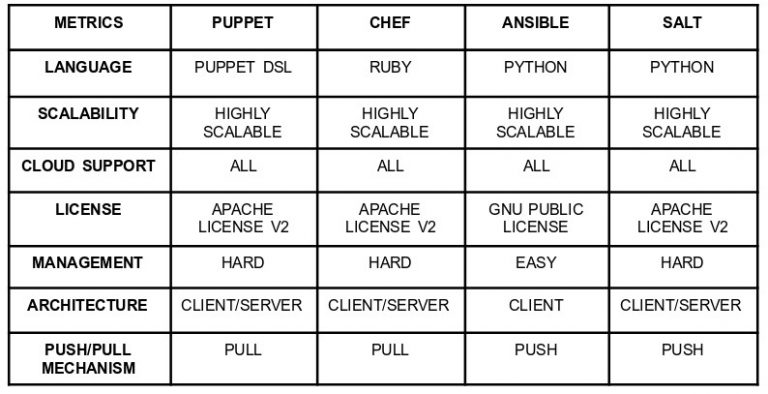
Below is a comparison among the most popular ones available in the market:
What is Ansible?
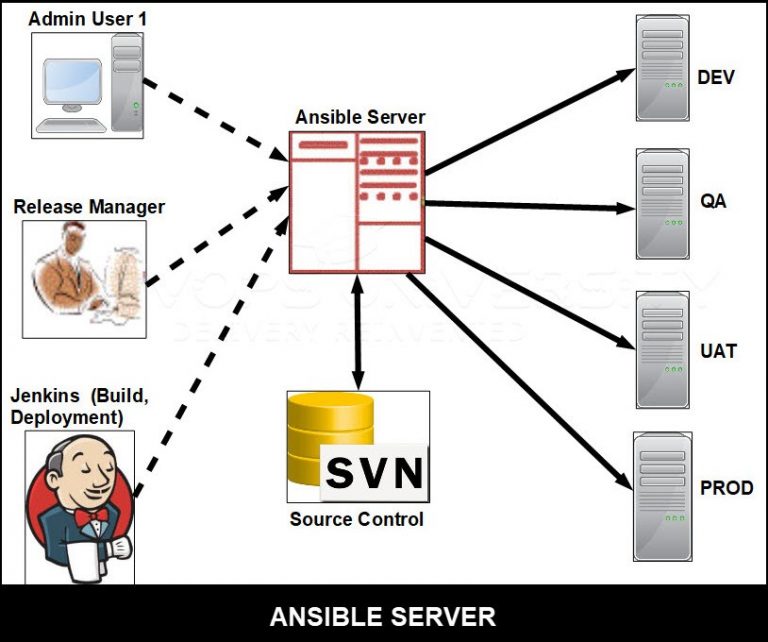
Ansible is a powerful tool by RedHat which can be setup very easily. It is used for IT Configuration Management, Deployment & Orchestration.
It is an extremely simple IT automation engine used to automate many IT processes like cloud provisioning, configuration management, application deployment and intra-service orchestration.
It helps improve the scalability, consistency and reliability of your IT environment.
Even if you don’t know the particular commands to accomplish a particular task, you can still work on Ansible by just specifying what state you want the system to be in and Ansible will take care of the rest.
What all Ansible can do?
 Provisioning: Ansible is used to provision the basic infrastructure, install services etc. After the underlying environment is provisioned, Ansible can also be used to provision resources, services, and cloud applications.
 Configuration Management: It establishes and maintains consistency of the product performance by recording and updating detailed information which describes an enterprise’s hardware and software.
 Application Deployment: You can make DevOps easier by automating the deployment of internally developed applications to your production systems. There are a number of steps that needs to be performed to deploy the engine, which Ansible does for you:
- Move a .war application from dropins directory to apps directory
- Add server.xml file
- Navigate to the webpage to see your application
 Security and Compliance: When you define your security policy in Ansible, site-wide security policies can be integrated into other automated processes. It means that, you need to configure your security details once in your control machine and it will be embedded in all other nodes automatically. Moreover, all the credentials (admin users ids & passwords) that are stored within Ansible are not retrievable in plain-text by any user.
 Orchestration: Ansible provides Orchestration and aligns the business requests with the applications, data and infrastructure. It provides definition of the policies and service levels through automated workflows, provisioning, and change management. This creates a scalable infrastructure that is in alignment with the application needs.
Features of Ansible
So why would you choose Ansible over the other IT automation tools available in market like Puppet and Chef? Well, the features below might help you reach an answer.
Simple: A very simple syntax written in YAML called playbooks is used by Ansible.
YAML is a legible data serialization language. No special coding skills are required and even people who do not know what is Ansible can likely read a playbook and understand what is happening. Installation is simple too. Simplicity ensures a quick start.
Agentless: Ansible is completely agentless. There are no agents/software or additional firewall ports that you need to install on the client systems or hosts which you want to automate. You don’t have to set up a management infrastructure separately like managing your entire systems, network and storage.
Powerful & Flexible: Ansible provides you with hundreds of modules to manage the infrastructure, networks, operating systems and services. Ansible’s capabilities all put together, allow you to organize and coordinate the entire application environment regardless of the deployment location.
Efficient: No extra software on your servers means more resources available for your applications. Ansible introduces modules which act as basic building blocks for your software. So, you can even customize as per your needs.
Ansible Architecture
The Ansible automation engine has a direct connection with those who create playbooks for execution of the Ansible Automation engine. It also interacts with the cloud services and Configuration Management Database (CMDB).
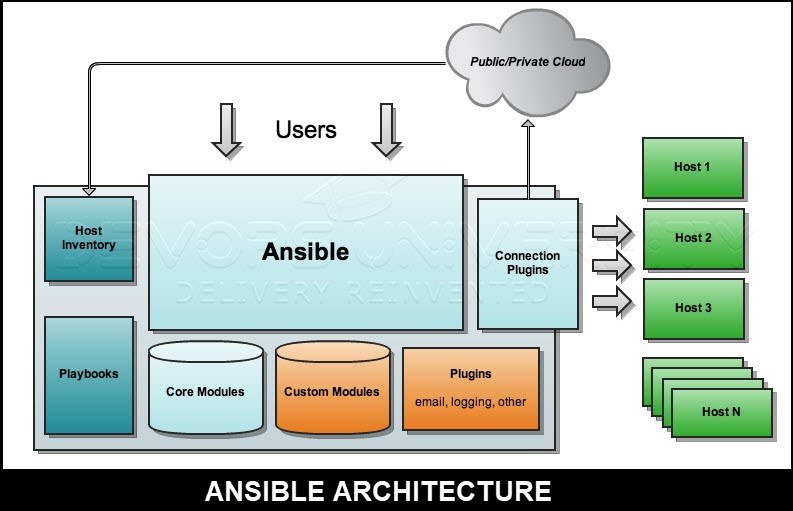
The Ansible Automation engine consists of:
- Inventories: An initialization file that contains information about the servers you are managing. They are lists of hosts (nodes) along with their IP addresses, servers, databases, etc.
- APIs: APIs are used to transport content for Cloud services, public or private.
- Modules: A module is an abstraction of a system task, like handling packages or updating files. Ansible has a vast collection of built-in modules, but you can also create customized ones.
- Tasks: A block that defines a single action to be executed, e.g. Install a package.
- Plugins: Plugins are bits of code that add to Ansible’s core functionality. Ansible ships with a number of useful plugins, and you can write your own too, very easily.
Some more important pieces in Ansible Architecture are explained below:
Networking: Ansible can also automate networks. Ansible uses the same simple and robust agentless automation framework IT operations and development are using.
Hosts: The hosts are just node systems which automates Ansible. It can be a Windows, Linux or a Redhat machine.
Playbooks: All the automation is defined here, through tasks using YAML format. Playbooks will be discussed in detail in the upcoming sections.
CMDB: It holds data related to configuration items, as well as to describe relationships between such IT assets.
Cloud: It is a network of remote servers hosted on the Internet to store, manage, and process data, rather than a local server. You can launch your resources and instances on cloud and connect to your servers.
How Ansible Works?
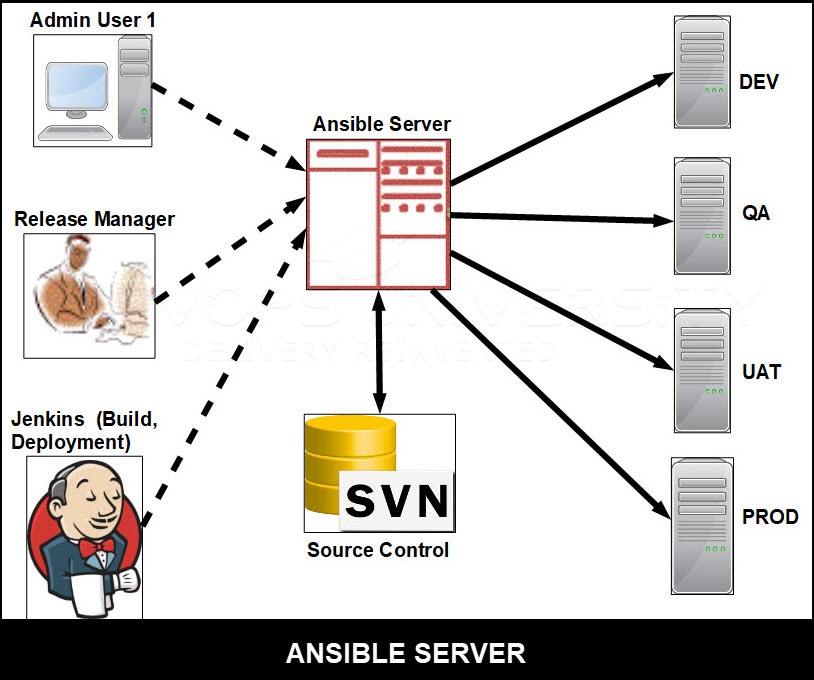
- The way Ansible works is it connects to the nodes and pushes out small programs, called “Ansible modules” on them.
- Then, Ansible executes these modules and removes them when its done. The collection of modules can be present on any machine, and there are no servers, daemons, or databases required.
- The management node controls the entire execution of the playbook and it is the node from where you run the installation.
- The inventory file has a list of hosts where the Ansible modules need to be run. The management node connects to these hosts through SSH and executes the small modules and installs the product/software, on each one of them.
- The best part about Ansible is that it removes the modules once they are installed.
All about Playbooks
- Playbooks are the files where Ansible code is written.
- Playbooks are written in YAML format. YAML stands for Yet Another Markup Language.
- Playbooks are one of the core features of Ansible and tell Ansible what to execute. They are similar to a to-do list for Ansible containing a list of tasks.
- Playbooks contain the steps which the user wants to execute on a particular machine. Playbooks are run sequentially.
- Playbooks are the building blocks for all the use cases of Ansible.
Playbook Structure
- Playbooks are structured using Plays. Each playbook is a collection of plays.
- Execution of a playbook from start to finish is called a play.
- A play maps a set of instructions defined against a particular host.
Playbooks contain Plays
Plays contain Tasks
Tasks call Modules and may trigger handlers
YAML
It is a strict typed language; so, extra care needs to be taken while writing the YAML files. Ansible uses YAML because it is very easy to understand, read and write when compared to other data formats like XML and JSON.
A YAML file starts with — (3 hyphens)
YAML represents data using simple key-value pairs using
key: value format. The space between : and value is a must.
How to create a Playbook
A YAML syntax needs to follow the correct indentation and the correct syntax needs to be written very carefully.
The different YAML Tags
- name
Name tag specifies the name of the playbook. Indicates what this playbook is all about and will do. A logical name should be given to the playbook. - hosts
This tag specifies the lists of hosts or host group on which the task/tasks need to be run. This tag is mandatory. It instructs Ansible to run the listed tasks on the specified host machines, which can be the same one or a remotely located machine. The hosts tag can have a group of hosts’ entry as well, so that the tasks can be run on multiple machines in parallel. - tasks
All playbooks should contain a list of tasks to be executed. Tasks are a list of actions to be performed. The tasks field contains the task’s name. This is not mandatory but is useful in debugging the playbook. Each task is internally linked to a piece of code called a module. A module that needs to be executed as a part of the task, and arguments the module required for execution.
— #Optional YAML start syntax
Jake:
name: Jake Blake
rollNo: 12
div: B
sex: male
… #Optional YAML end syntax</span>
You can also use abbreviation to represent dictionaries.
Example:
James: {name: jonty rhodes, rollNo: 38, div: A, sex: male} Representing List
To represent a list in YAML, every element (member) of the list should be written in a new line with same indentation starting with “- “ (- and space).
Example
You can also use abbreviations to represent lists.
Example
We can also use list inside dictionaries, i.e., value of a key is a list.
Example
YAML uses
These help in reading and editing large lines.
In both the cases, indentation is ignored.
Boolean (True/false) values can also be represented in YAML where boolean values are case insensitive.
Example
Roles
In Ansible, the role is the primary technique to split a playbook into multiple files. Writing and reusing complex playbooks is simplified using roles. Breaking a complex playbook into logical smaller chunks promotes reusability across these components.
Each role is related to a particular functionality, and includes all the necessary steps to provide the desired result either within that role itself or in other listed dependent roles.
Roles and playbooks are not the same. Roles are small functionalities which can be independently used but have to be executed through playbooks. You can never execute a role directly.
Top-level playbooks are the connections between the lists of hosts from your inventory file to the roles that need to be applied to those hosts.
Creating a New Role
The directory structure for roles is important in creating a new role.
- Roles have a structured layout.
- Each role is a directory tree in itself.
- The name of the role is the same as the directory name within the /roles directory.
Role
$ ansible-galaxy -h
Usage
ansible-galaxy [delete|import|info|init|install|list|login|remove|search|setup] [–help] [options] …
Options
-h, –help − Displays this help message and exit.
-v, –verbose − Verbose mode (-vvv for more, -vvvv enables connection debugging)
–version − Show program’s version number and exit.
Variables
Variable in playbooks are very similar to the way we use variables in any programming language.You can assign a value to a variable and use it anywhere in the playbook. One can also put conditions on the value of a variable and use it accordingly in the playbook.
Example
In the above example, a variable named tomcat_port is defined and assigned the value 8080.
Playbook targeting a single host
Ansible Ad-hoc commands
Ad hoc commands are commands which can be run independently, to perform immediate functions.
These commands are of one time usage.
Syntax of a typical ad hoc command:
Ansible [-m module_name] [-a args] [options]
Some of the ad hoc commands and their usage is listed below:
| Command | Usage |
|---|---|
| $ Ansible def -a “/sbin/reboot” -f 10 | Run reboot for all your company servers in a group, ‘def’, in 10 parallel forks |
| $ Ansible abc -a “/sbin/reboot” -f 12 -u username | To change from the default current user account, you will have to pass the username in Ad-hoc commands |
| $ Ansible def -m copy -a “src = /etc/yum.conf dest = /tmp/yum.conf” | Transferring a file to many servers/machines using SCP (Secure Copy Protocol) |
| $ Ansible def -m file -a “dest = /path/user1/new mode = 777 owner = user1 group = user1 state = directory” | Creating new directory |
| $ Ansible def -m file -a “dest = /path/user1/new state = absent” | Deleting whole directory and files |
| $ Ansible def -m yum -a “name = demo-tomcat-1 state = present” | Checks if yum package is installed, but does not update it |
| $ Ansible def -m yum -a “name = demo-tomcat-1 state = absent” | Check the package is not installed |
| $ Ansible def -m yum -a “name = demo-tomcat-1 state = latest” | Checks the latest version of package is installed |
| $ Ansible all -m setup | Finds information of all your facts |
Ansible Installation
There are two types of machines for deployment −
- Control machine − Machine that manages other machines.
- Remote machine − Machines that are handled/controlled by the control machine.
One control machine can handle multiple remote machines. So, to manage remote machines, Ansible is installed on the control machine.
Control Machine Requirements
Ansible can be run from any machine which has Python 2 (versions 2.6 or 2.7) or Python 3 (versions 3.5 and higher) installed.
Note − Windows does not offer any support for control machine.
Ansible uses ssh to manage remote machine, by default.
Ansible does not add any database nor does it require any daemons to start or keep it in running state. Ansible does not leave any software installed or running on the remote machines so there is no need to upgrade it when you want to move to a new version.
You can install the latest release of Ansible through Apt, yum, pkg, pip etc. Let us now see how to install Ansible on Ubuntu.
Ansible Installation on Ubuntu Machine
Now, let us install Ansible on a Ubuntu VM created on GCP. Once the VM is up and the connection is established.
Step 1: Run sudo apt-get update command

Step 2: Now, run the command sudo apt-add-repository ppa:ansible/ansible to add the repository. Then, press Enter.

Step 3: Run the command sudo apt-get install ansible. Then, press Y

Step 4: You will see the below screen once you press Y

Step 5: To check whether Ansible is installed or not, run the command ansible –version

Ansible Tower
Ansible Tower (formerly ‘AWX’) is a web-based solution that makes Ansible very easy to use by IT professionals. It acts as a hub for all of your automation tasks.
Tower grants access control over resources and sharing of SSH credentials without transferring those credentials.
Command line tools integrates well with Jenkins.
Tower can be installed using Ansible playbooks.
So, Ansible Tower is an exceptionally useful supplement to Ansible, capable of doing all what a CLI does. It complements the main application by automating and displaying the major tasks graphically – like dashboard-monitoring, for example. It is of great help to those who are new to Ansible as it acts as an easy-to understand visual tool. Though for playbook creation, Ansible’s CLI is still the best option available.
Summary
If you’re keen to become a DevOps professional and simplify your life by automating all your administration tasks, Ansible is a good choice to start with. With the learnings from this document on Ansible and configuration management, you get a good foundation to further build up on your knowledge and do more hands-on.
